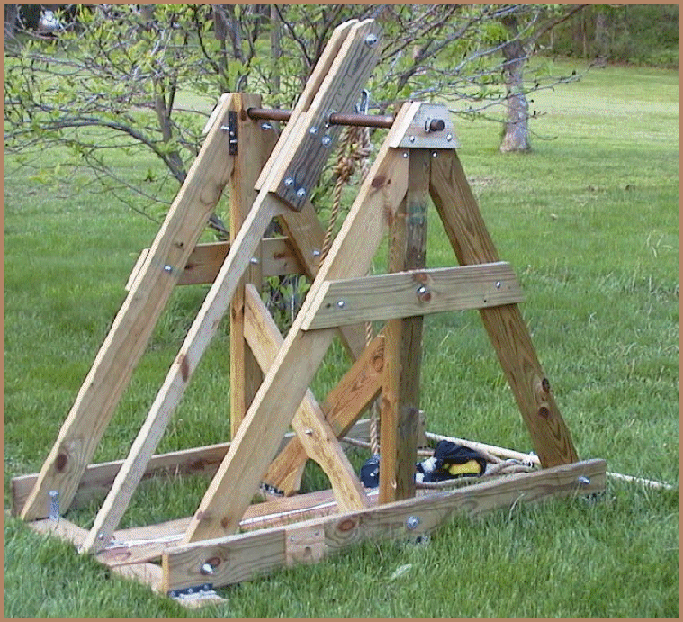
SCA Combat Trebuchet
This is a rough description of how my Trebuchet is put together and the materials I used. I’ve included it as a guide to help you design you own. Note: the diagrams and instructions reflect upgrades that aren’t in the photograph.
Materials used:
| Wood: | 2x6 |
| 2x4 | |
| 4x4 |
Hardware:
L-brackets (I made mine out of pre-drilled metal strapping)
3/8”carriage bolts (varying lengths)
3/8” lock washers, flat washers, nuts
1 ½” solid steel round bar
1 ½” set-screw pipe connecters
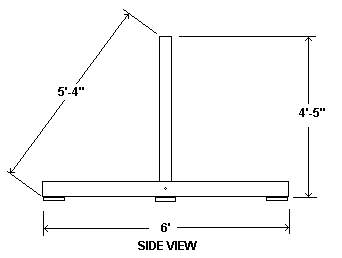
First I build the base, using the 2x6’s and the 4x4 for the uprights. I cut two 6’ pieces for the sideboards and three 4’ sections for the ground boards. I cut the 4x4s to 4’5” (They were originally 5’, I later had to shorten them.)
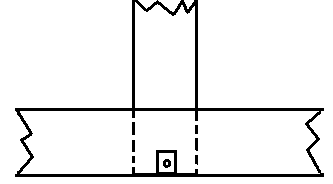
I centered the uprights on the sideboards. I drilled a hole through both pieces and aligned with the L bracket so that when the bolt is put through the other half of the L bracket is flush with the bottom of the upright.
NOTE: if you are making a counterweighted trebuchet you don’t want you uprights to be taller than half the length of you side boards. You run the danger of having your trebuchet flip over from the swinging weight if you do.
With the L bracket attached to the upright and the sideboard, I lifted the upright vertical and placed it near the end of the 4’ center ground board. I drilled a hole through and bolted it in place. I repeated the process with the other side. I placed the other two 4’ ground boards at the ends of the sideboards.
Using a carpenters square I made sure that the uprights formed a 90° angle. I then measured the length of my upright supports as shown above. Once I cut all the upright supports I put them in their positions on the sides up the uprights. Working my way around the frame I drilled a hole through each corner, making sure to align it with the L bracket as I did for the uprights. Once all the L brackets were attached to the sideboard/upright supports, I then continued to work my way around the frame attaching the ground support boards to the other half of the L brackets.
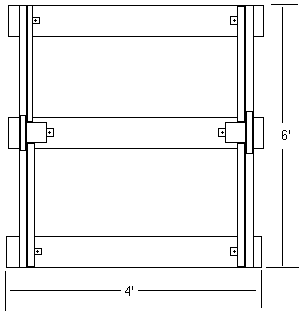
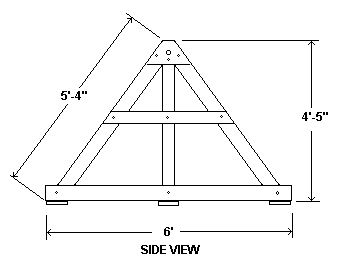
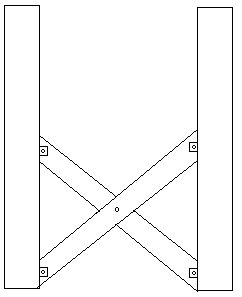
I then measured, cut, and mounted the center and top frame support boards as shown above. Both used three sets of bolts to secure them to the upright supports and the upright itself, except that the top support’s middle bolt was placed in the lower half of the board to leave sufficient room to drill the hole through for the axle. I then measured, cut, and attached my internal frame supports using the 2 x 4’s and once again the L brackets. They were attached between the uprights as shown below:
I used a 1 ½” counter sink drill bit to drill my holes through the top of the uprights. It was a tight fit for the axle so I used a round rasp to widen the hole. Once the hole was big enough for the axle to slide through easily, I turned my attention to building the throwing arm.
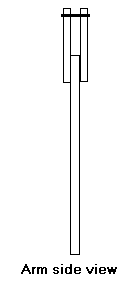
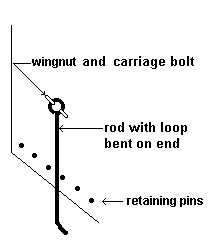
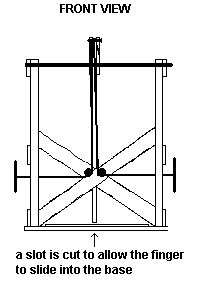
The part of the throwing arm that takes the most stress is where the axle passes through. The next highest stressed area is the short part of the arm where the force is applied. I bolted the long part of the throwing arm between two other pieces of wood. I drilled a hole through all three layers for my axle to pass through. I also created an adjustable release finger so I could easily adjust the release angle. When I finished my throwing arm looked like this:

Note: SCA siege weapon rules state that if a throwing arm is made of pine it must be re-enforced. For details on how this is done refer to the SCA siege engine manual or just make it out of some other wood.
I passed the rod through one side of the trebuchet, through the arm, and out the other side. I used 1 ½“ set-screw pipe connecters on each side of the throwing arm and on the outside of the frame too keep the arm centered in the middle. I found them in the electrical conduit section of my local hardware.
I made a trough out of ½” plywood. I cut a 6’ long piece that was as wide as the gap at the bottom of the “X” in my internal supports. I attached two sets of pulleys near the center of the “X” and ran two sets of ropes through them, attaching one end to the short end of the throwing arm. The other ends were attached to 4’ long T-handles that my pullers would use to apply the power to my trebuchet.
In this configuration, my pullers could sit on the ground and simply row to provide the power. I found from experience that it wasn’t so much how hard they pulled but how coordinated they did their pulls. With the 4’ long T-handles I could have up to 4 people pulling at once. This provided plenty of power to launch my tennis ball rocks. For a sling, I used the leg from an old par of blue jeans. It seems to hold up the best.
This design worked fairly well as a traction trebuchet. If you were to make a counterweight version, you would need to modify the design. First of all wheels would be a necessity (they also increase your range and take a lot of stress of the frame). Unless you really want to unload your counterweight every time you want to move it. You would also have to use a fixed weight with this frame design because there isn’t enough room for a bucket to swing. To use a swinging bucket, you would have to make the internal supports external by extending out the middle ground board and attaching them on the outside of the frame.